
ESD Control Panel operation manual
ESD Control panel is one equipment which supply pressure to SSV actuator to force SSV open.Below is Senoil ESD control panel operation manual points.
- Operation Instructions
- Introduction
Before dispatch, all pressure classes and functions of the equipment have been tested carefully in the factory, thus we guarantee that the performance data of the delivered product meet the index of the technical agreement. Nevertheless, the equipment can be damaged in the course of transport. Therefore, we recommend having a careful check of the equipment when it arrives at your factory.
- Operating Requirements
- Select a stable and dry place which is not exposed to
- Environment temperature: -20℃,max. 60℃
- Environment humidity must not exceed 95% to avoid
- When assembling, the front and the back of the equipment should be clearly
- Main technical parameters
- Sizes: 660x520x1050mm (LxWxH)
- Weight: 160kg
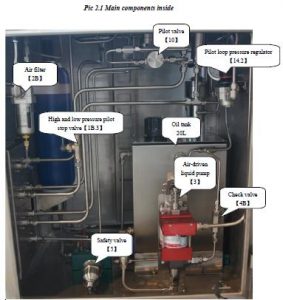
- Volume of tank: 20L
- W.P of SSV loop: 10,000psi
- Work before operation
- Check the drive air To make sure of the normal functioning of the equipment, the drive air pipeline size shouldn’t be smaller than 12mm or too long. In case the drive source is connected with Tee or Cross, please connect with the largest diameter end. The free pipeline of the drive source shouldn’t be too long to avoid damage from pressing
- Check of the drive medium
- Compressed air: pressure 6~10bar(90~145PSI), flow ≥800LN/min
- Particle size ≤5 μm
- Dew point at +10°C, water content ≤9.4 g/m3; dew point at + 2°C, water content ≤ 6 g/m3
- Check of working medium
- Check of interior pipeline connections
- Check of external pipeline connections
- Operation Method
The equipment could be put to use after finishing the procedures under 4.5. The operating procedures are as follows
- Check before commissioning
- Oil check. Add oil to top of level meter
- Check for connecting tightness of components
- Check of valve condition
- Start of system
- Manual pressurization of the air-driven pump
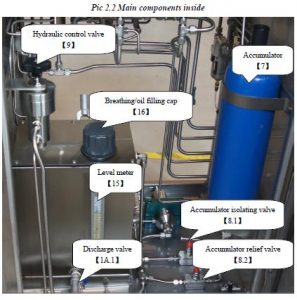
- Firstly shut off the isolating valve【1】in front of the accumulator.
- Increase the pressure to 10,000psi with manual function of the air-driven pump
- Hold for 10 Check for leakage and mark.
- Release the system pressure and strengthen where
- Automatic pressurization of the air-driven pump
- Firstly open the isolating valve【1】in front of the accumulator.
- Slowly regulate the pressure regulating valve【1】and observe if the air-driven pump works normally.
- Pressurize with the air-driven pump and increase the system pressure to 10,000psi(set as needed). Release the system pressure slowly with unloading valve of the The air-driven pump would start working automatically when pressure decreases and stop when reaching working pressure.
- Hold for 10 Check for leakage and mark.
- Release the system pressure and strengthen where
- Opening of safety valve
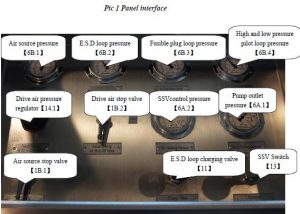
- Press the charging valve handle of the ESD loop to start air Observe pressure gauge of the ESD loop and loose the handle until pressure is stable.
- Pull the handle of SSV switch【13】to open SSV, and observe the SSV control
- Hold for 10 Check for leakage and mark.
- Release the system pressure and strengthen where
- Closure of safety valve
Push the handle of SSV switch 【13】to close SSV. SSV control pressure decreases to zero.
- RemoteS.D
Pull any one of the handles among 【20.1】、【20.2】、【20.3】、【20.4】of the remote ESD station to close SSV. SSV control pressure decrease to zero.
- High and low pressure pilot operation
Increase pressure and decrease pressure with a manual pump to simulate the on-site pipeline pressure. When the manual pump outlet pressure exceeds the set high pressure value, SSV would be closed and SSV control pressure decrease to zero. When the manual pump outlet pressure is lower than the set low pressure, SSV would be closed and SSV control pressure decrease to zero.
- System pressure relief
- Release the system pressure
- Shut off the drive air stop valve
Keep inside of the control panel clean
- Maintenance
- While the system is in operation, check visually the hydraulic line connections each week for leakage and in case of leakage, the connections shall be Strengthening of the pipe joints, screws, adjusting screws, and the connecting pipelines every 6 months is recommended.
- Check the oil tank liquidometer visually and make sure the liquid level maintain within the upper limit of the middle of the oil When it’s not sufficient, please supplement in time.
- Repair or change timely for un-working
- Pay attention to change of the oil Take samples to test the oil pollution level every six months and make sure to meet the oil cleanliness requirement. Purify or change new oil when it’s out of standard.
- When abnormal conditions(like noise or air driven pump starts at high frequency) occur at certain parts, timely analysis are needed instead of keeping on using to avoid
- Keep the control panel clean and avoid using it wide open to prevent it from various
- Annual check for once at least is
Spot check combined with regular check. Record and file.
Leave A Comment